Installation
dataslayer is available from:
- Chrome Web Store: https://chrome.google.com/webstore/detail/dataslayer/ikbablmmjldhamhcldjjigniffkkjgpo
- Firefox Add-ons: https://addons.mozilla.org/en-US/firefox/addon/dataslayer-firefox/
Required permissions
dataslayer requires two types of permissions: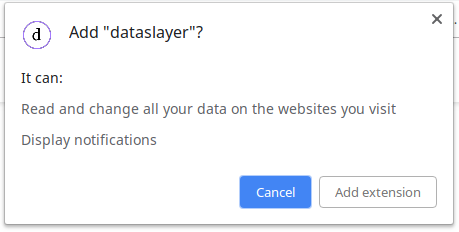
- Read and change all your data on the websites you visit: dataslayer needs this level of permission because tag detection is done by listening to the network for pixels being fired, while data layer detection is done by injecting code into the debugged page. dataslayer does not listen to any of your data for a page until you have opened the dataslayer developer tools panel, and never processes your data anywhere other than on your computer.
- Display notifications: this is used only to display a notification on initial installation and on future upgrades.
Accessing dataslayer
Once you’ve installed dataslayer, you can access it via your Developer Tools (Ctrl+Shift+I on Linux / Windows, Command+Option+I on Mac). If installation was successful, you’ll see a new tab titled ‘dataslayer’.
Click into this tab to begin your session. If you need to debug the site you’re already on, you may need to refresh the page after opening dataslayer to ensure you capture all data.
Using dataslayer
Overview
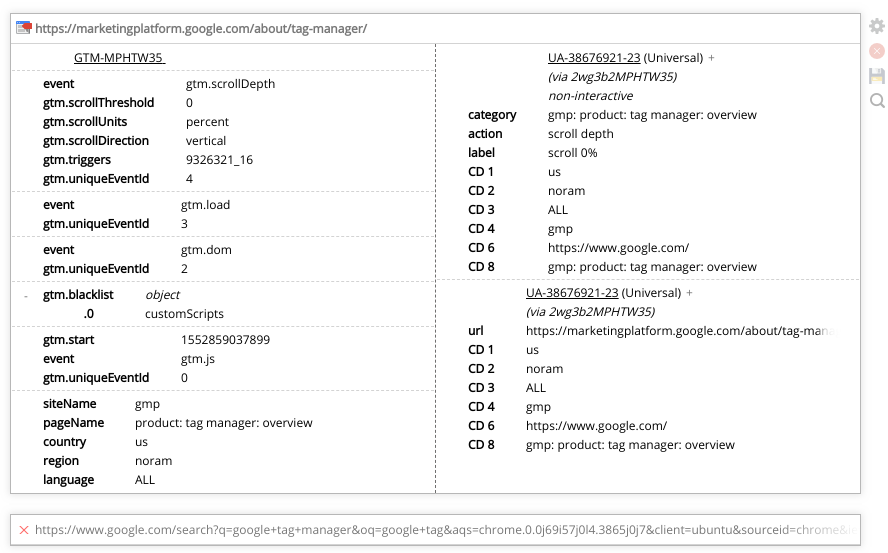
Each URL visited while dataslayer is active will display as a group within dataslayer. These appear in reverse-chronological order (newest at top). Click the URL to collapse or expand the group; groups automatically collapse when you navigate to a new page.
If a tag management system is found, the appropriate logo appears next to the URL; if no supported tag management system is found, a red X appears instead.
Data layers and tags for each page live within the group designated by the page URL - data layers on the left, tags on the right. Note that vertical alignment of a data layer entry and a tag does not indicate that the tag was fired by the data layer entry. It’s simply separate columns of data.
Data layers & tag management systems
The data layer view displays various levels of information depending on what tag management system is in use:
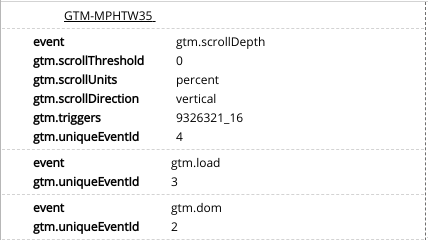
- Google Tag Manager: container ID(s) and state of the data layer
- Adobe Launch: build and environment information, state of all data elements, and any triggered rules
- Adobe DTM: build and environment information, as well as any triggered load rules
- Tealium: container ID and state of the data layer
- TagCommander: state of the data layer
- additional data layer objects (see Settings): state of the object
For array-type data layers (e.g. GTM), each array entry (dataLayer.push) will appear as a block separated by a light border. This is also the case for load rules. Object-type data layers will generally appear as a single entity. Nested entries can be expanded or collapsed by clicking the + or - next to the entry; shift-click the + to expand all the way down.
Note:
If multiple tag management systems are found on the same page, information on all of them will be displayed sequentially.
If multiple GTM containers are found on the same page, a dropdown will allow you to toggle among them.
Three-column view
As of version 1.2.0, this is the default view for pages containing Google Tag Manager or Adobe Launch.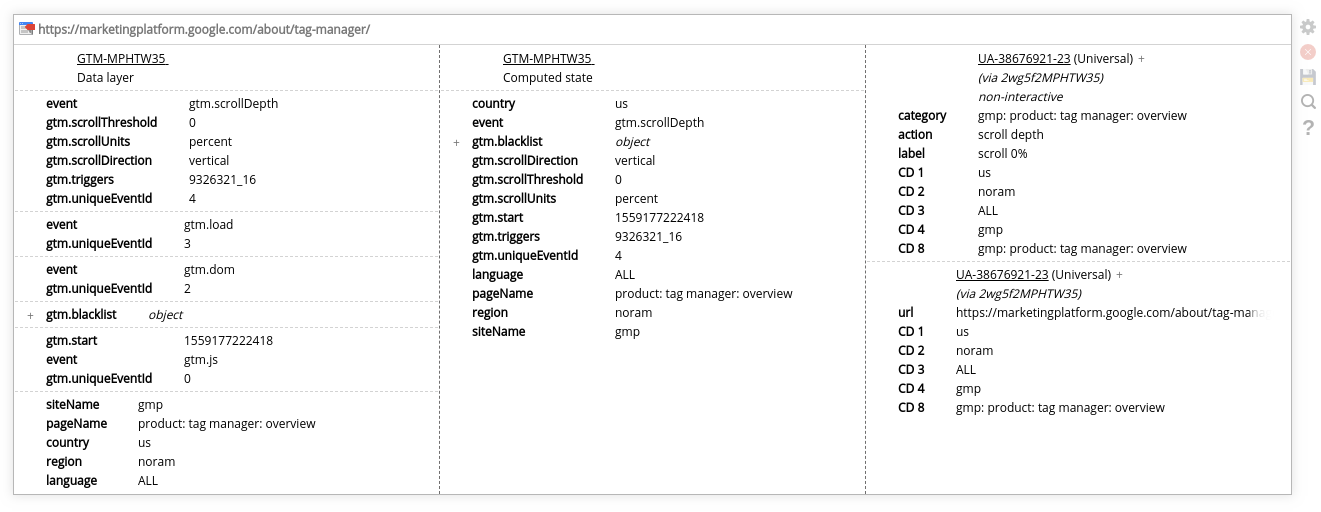
For supported TMSs (GTM and Launch), three-column view provides a more effective view into the distinction between the current state of data and the history of fired events. Rather than putting TMS info in one column and tags in another, this view provides:
- one column for the data layer (GTM) or fired rules (Launch)
- one column for the computed state of the data layer (GTM) or data elements (Launch)
- one column for tags
The computed state of the GTM data layer reflects the latest value for each key, across all pushes (e.g. after a series of clicks, the “Click Text” value will be that of the last element clicked). Think of it as a dictionary of what value you’d receive if you referred to the data in it at the current time, while the data layer will show the history of that data.
While the order of the TMS columns can be switched in the settings, tags (if present) will always appear in the rightmost column.
Tags
dataslayer supports some analytics and other tags:
- Google Analytics (App + Web, Universal and classic)
- Adobe Analytics
- Floodlight

Each tag block contains the following information, when available:
- UA-ID or report suite ID
- Tag type (e.g. Universal, Adobe Analytics)
- Tag hit type (in certain cases, e.g. timing hit, Adobe click event)
- (Google Analytics only) callouts for GTM-fired tags and non-interactive events
- A subset of all information most relevant for the hit type, e.g.:
- Adobe Analytics pageview: props, eVars, campaign, pageName, site section, events, etc.
- Adobe Analytics track-link call: all standard, plus link name
- Google Analytics pageview: URL or path; any custom dimensions
- Google Analytics event: event category, action, and label; any custom dimensions
Click the + next to the tag brand to view the full list of query parameters and values in the tag.
Action bar

The right side of dataslayer allows access to some additional actions:
- The gear icon (“Options”) provides access to your settings.
- The red X icon (“Clear History”) will clear your history, with the exception of preserving some info about the currently active page.
- The disk icon (“Import / Export”) will allow you to export a session to a JSON file, or import and review/add to a previous session.
- The magnifying glass icon (“Toggle Search”) toggles the search bar, which will filter your data as you type your search phrase. Note that search is case-insensitive. Search can also be toggled with the keyboard shortcut Ctrl+Alt+F.
dataslayer settings
Settings are automatically saved as you edit them.
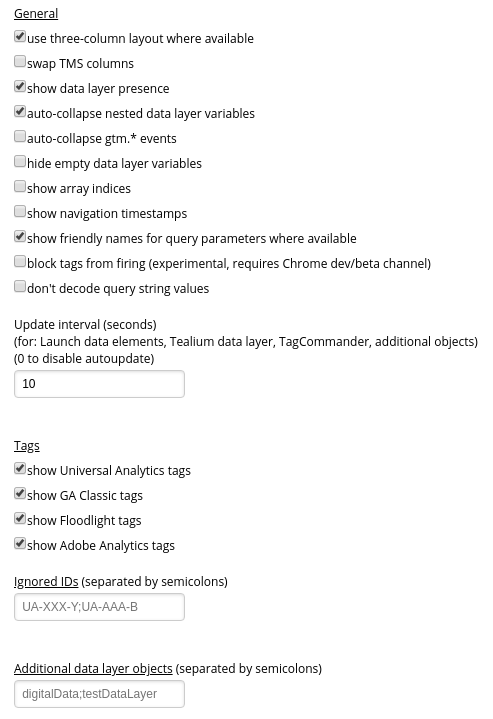
General
- use three-column layout where available: enable (default) or disable side-by-side views into Google Tag Manager and Adobe Launch data.
- swap TMS columns: reverse the order of the TMS columns in three-column layout.
- show data layer presence: enable (default) or disable the TMS logo / X in each page group.
- auto-collapse nested data layer variables: when this option is enabled (default), nested variables such as Google Analytics enhanced ecommerce will automatically be collapsed to save space.
- auto-collapse gtm.* events: when this option is enabled, data layer events like gtm.click and gtm.scrollDepth will be collapsed by default; click the event to toggle it.
- hide empty data layer variables: when enabled, if no value is set for a key, hide it entirely.
- show array indices: when enabled, show a faint indicator of the array index for values inside array-like data layers.
- show navigation timestamps: when enabled, show a faint timestamp for each pageload.
- block tags from firing: requires use of the Chrome dev or beta channels. When this option is enabled, supported tags will be blocked from actually sending to the analytics platform. Note that blocking does not take the Tags selections into account (i.e. all supported tags are blocked, regardless of whether or not they are shown).
- don’t decode query string values: when enabled, tag parameters (e.g. a URI of ‘/test/value’) will be presented in original, encoded format (e.g. ‘%2Ftest%2Fvalue’)
- update interval (seconds): the values of all non-GTM data layers (including Launch data elements) are updated on a timer - set the interval of the timer here (e.g. “5” for every 5 seconds), or disable it entirely by setting it to 0. Note that Launch data elements will update after a rule is fired regardless of the value of this setting. Note that if your Launch data elements have side effects that would be undesirable for ongoing polling (e.g. a custom code element that also makes a fetch request) you should disable auto update by setting this to 0.
- don’t update Launch elements on rules: enable to prevent Launch data elements from automatically updating when a rule is completed.
Tags
All supported tag types are shown by default; these can be individually disabled.
Ignored IDs
To filter out tags hitting specific analytics properties, enter the property IDs here.
Additional data layer objects
Add global Javascript objects to watch here (e.g. digitalData).
Release notes
Release notes and history are available here.